Dropdown menus are an essential part of many websites. Here, we’ll talk about the reasons to use dropdown lists and teach you how to create and customize dropdowns. Follow our step-by-step instructions to create a perfect menu for your site.
What Is a Dropdown Menu?
A dropdown menu (also spelled as ‘drop down menu’ and called ‘a dropdown list’) is a menu that includes several options (submenus). As the name suggests, the list of submenus becomes visible, i.e., drops down, when users trigger the list by hovering the mouse over the menu item or clicking on it. Usually, it’s a part of the navigation bar of the website.
Why Use Dropdown Menus in WordPress?
If you have a small website, you might do without a dropdown menu. All your necessary links are likely to fit in one row of the navigation bar. With time, when your website grows, you may need to add more items. That’s when a dropdown menu comes in useful. The main purpose of a dropdown menu is to organize items.
A dropdown menu is essential for your website If you have an online store. It’s hard to imagine an eCommerce website with multiple categories without dropdown menus. Grouping products into categories and adding them as submenus guarantees faster navigation and a better user experience.
For websites that have a blog, it’s possible to group posts by topics into categories and to include these categories in a dropdown menu.
In short, dropdown menus aim to:
save the space
organize links by uniting similar items
facilitate user’s navigation
WordPress Themes that Support Dropdown Menus
Creating a dropdown menu to manage website navigation on a WordPress website is a built-in feature. Yet, it depends on your theme. Thus, you have to check whether your theme supports this functionality.
If you haven’t installed a WordPress theme, you can check the theme’s demos to see whether dropdown menus are available. Also, you can read the theme’s description and documentation to find this feature.
If you already have a theme, you can try to customize your menu following the steps below. If your theme allows you to arrange menu items, you will be able to create a dropdown list.
How to Add a Dropdown Menu in WordPress: Step by Step Instructions
Adding a dropdown menu in WordPress is quite easy. You can do this in several ways by
editing menu items via the Menus submenu in Appearance on your dashboard
managing menus with a Live Preview
using plugins to customize menus
Let’s look at these methods.
Editing a Navigation Menu in WordPress
1. Creating or Choosing a Menu
To customize your navigation menu, open the ‘Menus’ submenu in ‘Appearance’ on your dashboard.
If you already have a navigation menu and want to edit it, you can continue to the next step. Alternatively, you can create a new menu and edit it. To do this, click on the ‘Create a new menu’ on top of the editing area.
2. Adding Menu Items
Then, you can start customizing your menu. On the left, you‘ll see the ‘Add menu items’ option and a list of items you can add. Precisely, it’s possible to choose from pages, posts, custom links, and categories. Tick the items you wish to include and press the ‘Add to Menu’ button. For instance, in the screenshot below, you can see that we are adding the ‘About Us’ page to the menu.
You should choose all the necessary items, including those that will function as WordPress submenu dropdown items.
The chosen items will appear in the right part, in the Menu structure section.
3. Arranging Menu Items
The menu items you have selected will appear in the chosen order. At this stage, you can organize the menu, changing the position of items and creating submenus.
You need to drag the items up and down to create the desired order.
Similarly, to create a dropdown menu, it’s necessary to transform menu items into submenus. If you drag a menu item to the right, it will become a submenu. The screenshot below shows a menu item ‘About Us’ that we added in the previous step and three subitems (Our Story, Our Partners, Careers with Us). When finished, remember to save the menu.
If necessary, you can rename menu items. To do this, click on the arrow on the right and change the Navigation Label according to your needs.
4. Choosing Navigation Menu’s Location
To see your new menu, decide where you want it to appear. In the ‘Menu Settings’ section, tick the necessary option in the ‘Display location’. Then, remember to save the menu.
Your dropdown menu is ready. You can open any page and view your new menu. As shown in the screenshot below, the menu item ‘About Us’ now has an arrow indicating that it includes several submenus. It’s possible to see them when users hover a mouse over ‘About Us’.
Managing Navigation Menu with Live Preview
Another way of creating a dropdown menu in WordPress is by editing the navigation bar with a Live Preview. The steps you need to take are very similar to those described above.
You can also create multilevel dropdown menus. We’ll show the process of making such menus and the results by editing the Blog menu item.
1. Opening the Menu Using Live Preview
After opening the Menus submenu in Appearance on the WordPress dashboard (like we did previously), you’ll see the ‘Manage with Live Preview’ option next to the title ‘Menus’.
When you click on it, you’ll see a dashboard with a list of menus on the left and a preview of a page with the current menu. To edit the menu that you see, you can click on the pencil icon displayed on the menu.
Then, on the left, you’ll see the menu’s title and the option ‘Edit Menu’. When you click on it, the menu items you can edit will be visible. As you can see in the screenshot below, the Blog item doesn’t have any subitems.
We’ll create a multilevel dropdown menu, adding blog category pages.
2. Adding and Arranging Menu Items
Adding category pages to the menu is similar to adding pages. You simply need to
click ‘Add Items’
choose ‘Categories’ from the list
open the list of available categories by clicking on the arrow
tick the categories you want to select
press ‘Add to Menu’
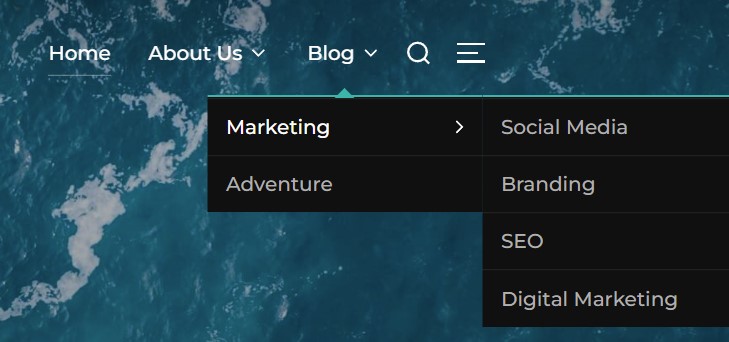
As you can see in the screenshot above, the blog category ‘Marketing’ includes several subcategories (Branding, Digital Marketing, SEO, Social Media). Yet, blog subcategories don’t necessarily need to be subitems of the second level in the menu. In other words, the Blog item in the navigation menu can include Marketing and other subcategories as subitems of the same level. It’s up to you to decide whether to show these levels.
To arrange the menu and create multiple levels, use the technique described above: drag menu items to the right to make them subitems. If you need to create the next level of the WordPress dropdown menus, drag the item to the right again.
The screenshot below illustrates the menu item Blog and two subitems – Marketing and Adventure. The Marketing submenu also includes several subitems.
After saving the menu, you can preview it without leaving the customization mode by hovering the mouse over the menu. Otherwise, you can open the website and see the changes. As seen in the screenshot below, there are two levels in the Blog menu.
Also, the icon next to the About Us item shows that there’s another dropdown list (which we created earlier). So, you can have as many dropdown lists as you wish.
Adding CSS to the Menu
The theme you are using determines the style of your navigation menu and dropdown lists. Still, you can change the styles by adding custom CSS codes to menu items.
First, you need to create the style that you want to use. To do this, you have to open ‘Customize’ in the Appearance menu of your dashboard and choose ‘Additional CSS’.
Next, you have to create a style and insert your custom code that will define the look of menu items, as in the screenshot below.
Afterward, you can return to editing menus. In the upper part of the menus’ customization area, choose ‘Screen Options’.
When you expand these screen options, tick ‘CSS Classes’ to allow applying custom CSS styles.
Then, when you are customizing menu items, you’ll be able to add your style in the CSS Classes field.
After saving the menu, you’ll see the result. Our code included a grey background and underlined italics. That is the result you can see in the screenshot below.
WordPress Plugins for Creating Dropdown Menus
Different WordPress plugins can help you in customizing your WordPress dropdown menus. Here, we’ll look at the most popular ones.
1. Max Mega Menu
Max Mega Menu by megamenu.com, which has more than 400.000 active installations, is one of the most user-friendly plugins with a vast variety of options for editing the menu. It’s compatible with WordPress version 4.9 or later and its latest update (January 2022) has been tested up to 5.9.2.
After installing and activating the plugin, you’ll see additional customization options in your menu customization area. As shown in the screenshot below, you can hover the mouse over a menu item and adjust it separately. Also, you can choose the event type, i.e., when you want your dropdown menu to appear (hover or click). Likewise, you can add effects such as fading and adjust their speed.
Additionally, you can create various menu themes and customize them to your liking.
The menu theme customization includes a huge variety of options.
In General Settings, you can select arrow styles, line height, shadows, and hover transitions.
The Menu Bar lets you adjust menu height, background color (it’s possible to set gradients), padding, border radius, the color of usual item fonts color and during the hover effect, item background color (usual and on hover), item spacing, padding, border color, and item divider (if you need it).
The Flyout Menus tab is responsible for the dropdown list’s settings. Similarly to the menu bar, you can select submenu items’ background colors (usual and on hover), height, padding, fonts, etc. The screenshot above illustrates the changes in menu item background colors, font colors, and hover effects created with this plugin.
If you are creating a mega menu, you can also customize it with this plugin’s special tab.
The Mobile Menu helps you adjust setting for mobile devices to make your navigation menu look good on any screen. You can specify when the usual menu should be transformed to a mobile menu and customize the toggle bar and mobile submenus.
With the Custom Styling tab, you can add CSS coding if you want to apply your styles to the menu.
If necessary, you may add icons to the menu items (in our case – next to the About Us title).
Additional menu item settings allow you to hide text, arrows, and the item on mobile or desktop as well as disable links and adjust alignment and icon position.
The Max Mega Menu also has a Pro version with three types of licenses:
Personal ($29) for 1 website, with support and updates for 12 months
Business ($49) for 5 websites, with support and updates for 12 months
Developer ($99) for 99 websites with updates for a lifetime, support for 12 months
The features that you’ll find in the Pro version are:
sticky menu
tabbed, accordion, and vertical mega menus
WooCommerce & Easy Digital Downloads integration
additional menu icons and custom icon functionality
Google and custom fonts
roles and users’ permissions settings
menu logos and item badges
search box
2. WP Mega Menu
WP Mega Menu by Themeum is another user-friendly plugin with a multitude of menu customization options. It works with WordPress 4.0 and newer and got the latest update five months ago; it has been tested up to version 5.8.4.
Similar to the Max Mega Menu plugin, WP Mega Menu uses themes to customize menus. There are three themes by default, and you can adjust each one as much as you prefer.
As shown in the screenshot above, theme settings have numerous options that you can change. Let’s look at some of them.
General Settings include the theme title, enabling/disabling a sticky menu and a search bar, dropdown arrow types, and search field placeholder.
The Menu Bar settings let you choose the background color (with the possibility to set gradients), height, padding, border radius, and shadow.
With the Brand Logo settings, you can upload your company’s logo image and set its height, width, and margins.
First Level Menu Items and Sub Menu Items allow you to adjust the look of items in your menu and dropdown lists. Accordingly, you can set fonts (type, size, weight, height), item background colors (usual and on hover), padding, margins, borders, item separators, etc.
The Dropdown Menu tab includes settings for the width, background color, padding, border radius, and menu borders.
With Animation settings, you can choose from such effects as pulse, fade-ins, zoom-in, slide-in, and flip-in. It’s possible to turn off animation, too.
There are also settings for the mobile menu, social links, and custom CSS/JS styles.
After installing and activating the plugin, you can start customizing the themes. Then, switch to the menu editing on the WordPress dashboard. In the field where you can add items, you’ll see the Mega Menu Settings. Enable the mega menu and tick the theme you want to use.
After saving the changes, you can preview your WordPress dropdown menus and continue the customization process if necessary.
The plugin also has a pro version that includes:
vertical menu,
CTA button,
Login/Signup
Woo cart button.
The annual payment is:
Individuals Plan (1 site) – $29
Freelancers Plan (5 sites) – $49
Agencies Plan (unlimited licenses) – $79
3. WordPress Mega Menu – QuadMenu
WordPress Mega Menu – QuadMenu is the tool that helps to create multi-column mega menus and style dropdown lists. Updated in March 2022 and having more than 20000 active installations, this popular plugin can work with WordPress 4.6 or later.
We must mention that this plugin doesn’t always support automatic integration into any WordPress theme. However, you can use it after manual integration. ‘If your menu doesn’t seem to be working properly after using Automatic Integration, the most common scenario is that you have residual styling from your theme and would need to use Manual Integration instead,’ the plugin warns. You’ll see the instructions on manual integration in the plugin’s options after activating it.
This Mega Menu plugin also uses themes to customize WordPress submenu dropdown items and the navigation bar. In the Options tab, you can adjust the theme, changing the menu style, dropdown appearance, typography, animations, and mobile settings.
To be precise, you can customize the menu layout, items alignment, dropdown trigger, colors (usual and on hover), links, icons, buttons, etc. It’s possible to change many parameters, such as height, margins, padding, etc.
The screenshot below shows the dropdown menu styled with the plugin. As you can see, the navigation bar and the dropdown menu have different fonts and colors.
The title of this plugin is ‘Mega Menu’, and it does help create mega menus. It’s possible to set the number of columns, choose the mega menu layout, and add the necessary items to the lists.
In the screenshot, you can see a two-column mega menu with blog categories.
The pro version of the plugin includes the following additional features:
integration with the live theme customizer dashboard
tab and carousel mega menu
login and register form for users
social network icons
You can choose from 3 plans:
Personal (one site license) is $30
Agency (five sites licenses) is $60
Developer (unlimited sites licenses) is $90
All plans include lifetime updates and personalized support.
Tips on Creating WordPress Dropdown Menus
1. Take Advantage of WordPress Inherent Functions
As WordPress has built-in options to manage website navigation, we recommend mastering this functionality. Arranging menus doesn’t require many skills, and dragging elements to create submenus is pretty straightforward.
2. Use Live Preview
WordPress lets you see the changes in your dropdown menus when using the Live Preview. Thus, you don’t have to switch between the customization dashboard and the website page to make sure you like the edits.
3. Create Multi-Level Menus
Even with the inherent WordPress functions, it’s possible to make dropdown lists that include several levels. Apply the same principle of dragging elements to the right, and you’ll get a multi-level menu.
4. Add Multiple Dropdown Menus
To save space on your navigation bar, you may add several dropdown lists. Remember to group the pages logically so that users can easily find necessary elements.
5. Install Plugins for Extra Customization
You can customize your dropdown menu by adding a CSS code or installing plugins. You can find free plugins with multiple options to adjust colors, typography, and hover effects.
FAQs on Creating WordPress Dropdown Menus
What are the ways to add WordPress dropdown menus?
You can add dropdown menus using WordPress built-in functionality. You can create and edit dropdown menus as a part of the navigation menu via Appearance – Menus in the WordPress dashboard. After choosing and adding the necessary items to the menu, drag items to the right to make them subitems. You can also install plugins to create and customize menus with dropdown lists.
What items can you add to a dropdown menu in WordPress?
Dropdown menus can contain links to pages, posts, blog categories, custom links, and WooCommerce pages. Select the necessary items from the corresponding lists when creating/editing a menu.
Is it difficult to customize dropdown menus in WordPress?
If you want to apply specific styles to dropdown menus, you can turn on custom CSS styles for them and add the necessary coding. Alternatively, you can use a plugin to customize the dropdown menu’s look.
What should you check when creating dropdown menus?
First, it’s necessary to ensure that your WordPress theme supports dropdown menus. Second, if you want to use plugins to adjust your dropdowns, check that it’s compatible with the theme you are using. In some cases, you’ll need to activate the plugin manually.
Top-Notch WordPress Development Services from GetDevDone
Creating and adding WordPress dropdown menus seems straightforward enough. But If you still have questions or need assistance with this task, our expert WordPress developers can help. With 16+ years of industry experience and thousands of successfully completed WP projects, we know everything about the world’s most popular CMS.
Reach out to us with any WordPress-related request, from building a custom theme or tweaking your current one to Core Web Vitals optimization and plugin development.
What makes an e-commerce business successful? A vast and varied inventory, multiple ways to accept payments, friendly and helpful customer support via multiple channels, or on-time delivery? Yes, all of that. Plus an easy-to-use and visually interesting website, as it is the ease of interaction with a site that can make a real difference. In […]
Does your Magento store load too slowly? Here are some helpful tips on how to speed up Magento 2 sites. In this post, we talk about effective Magento 2 speed optimization techniques that online merchants can apply to enhance the performance of their stores. While some of these require a deep knowledge of the system […]
In this post, we discuss the intricate world of Consent Management Platforms (CMPs), and how to navigate through them to find the best fit for your business.